
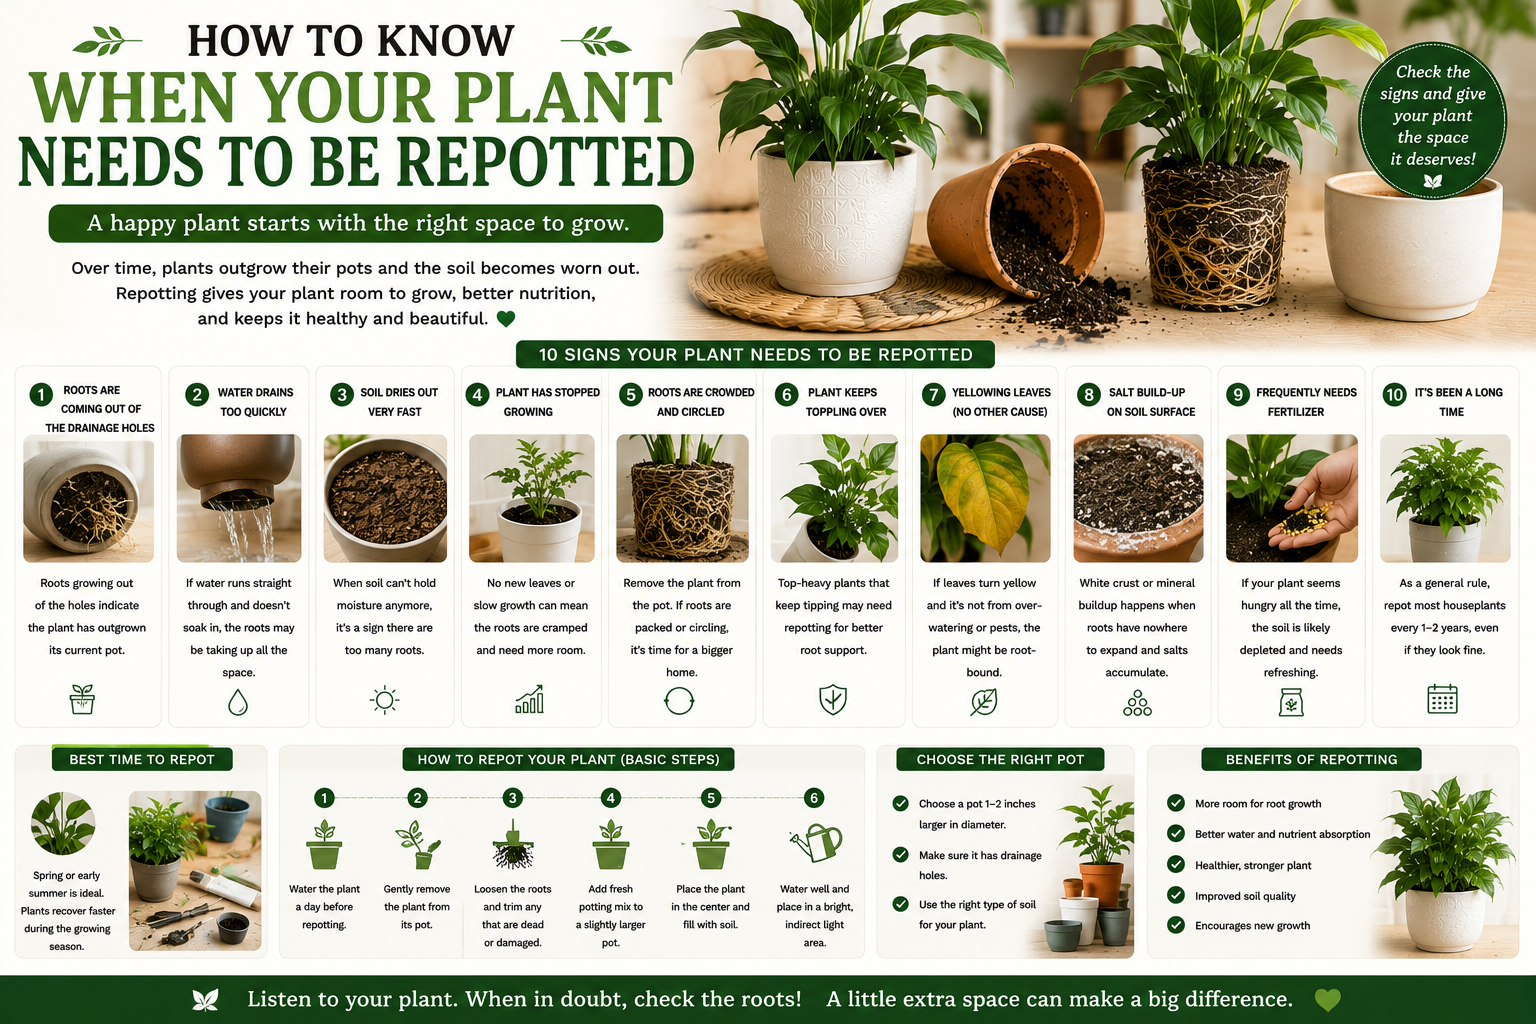
Repotting is one of those plant care tasks that many people delay for too long, often because the signs that a plant needs more space are subtle at first and easy to attribute to other causes. A plant that has gradually become root-bound does not collapse overnight — it declines slowly and persistently, producing smaller leaves, stalling in growth, wilting more quickly between waterings, and losing the vibrant, vigorous appearance that characterized it in its earlier months. Learning to recognize the signals that indicate a plant has outgrown its container, and responding to them promptly with the right repotting approach, is one of the most reliably impactful interventions available in ongoing plant care.
Why Repotting Matters for Plant Health
A plant’s root system is the foundation of everything that grows above the soil surface. Roots absorb water and nutrients, anchor the plant physically, and drive the metabolic processes that produce new leaves, stems, and flowers. When the root system has filled the available space in a container and has no room for further expansion, every one of these functions is compromised. Water absorption becomes less efficient because the dense mass of compacted roots cannot process available moisture as effectively as a root system with room to grow. Nutrient uptake declines because root tips — the primary sites of mineral absorption — have nowhere new to explore. New growth slows or stops because the energy required to produce it cannot be supplied by a root system operating at or beyond its capacity.
Beyond the physical constriction of root-binding, the potting mix in a container degrades over time regardless of how well-maintained the plant appears above the surface. Organic matter decomposes, perlite breaks down, and the physical structure of the medium collapses progressively until water moves through it poorly and air pockets disappear. A plant in two-year-old potting mix that has never been refreshed is growing in a medium that bears little resemblance to the nutrient-rich, well-aerated blend it was first planted in — and this degradation affects root health independently of root-binding. Repotting addresses both problems simultaneously, giving the roots new space to explore and a fresh growing medium that supports healthy function.
How often most plants need repotting
Most common houseplants need repotting every one to two years, though this varies significantly with the plant’s growth rate, the size of its current container, and the conditions it is growing in. Fast-growing plants like pothos, philodendrons, and tradescantia may need repotting annually during periods of vigorous growth. Slow-growing plants like snake plants, ZZ plants, and cacti may comfortably remain in the same container for three years or more before showing the signs of constraint that indicate a move is needed. Spring is the ideal time to repot for most plants — the natural growth surge of the season gives plants the energy to recover from root disturbance quickly and explore their new growing space with maximum vigor.
The Clear Signs That a Plant Needs Repotting
The most unambiguous sign that a plant has outgrown its container is roots emerging in significant quantity from the drainage holes at the base of the pot. A few fine root tips visible at the drainage holes is normal and indicates a healthy, actively growing root system. Roots that have grown extensively through the drainage holes, coiled around the base of the pot, or formed a visible mat beneath it indicate a plant that has been root-bound for some time and needs more space promptly. This is the clearest and most easily observed signal, which is why checking drainage holes is a valuable part of any routine plant care session.
A root network that has become visible at the soil surface — with roots circling the inner wall of the pot or forming a dense, tangled layer across the top of the growing medium — is equally clear evidence of root-binding. Soil that dries out completely within twenty-four hours of thorough watering suggests that the root mass has become so large relative to the soil volume that moisture is being consumed almost immediately, leaving little buffer against drought stress. A plant that was growing steadily and has suddenly stalled during the active growing season, producing no new leaves despite appropriate light, watering, and feeding, may be root-bound to the point where growth is physically constrained regardless of the resources available to it.
How to Repot Without Stressing Your Plant
The repotting process itself, when done correctly, causes minimal lasting stress and is followed within two to four weeks by a noticeable surge of new growth as the plant explores its expanded growing space. The most important preparation is choosing the right new container — one size larger than the current pot, typically two to four centimeters wider in diameter. Moving to a dramatically larger container in one step is counterproductive: the excess soil volume holds more moisture than the root system can process, increasing the risk of root rot in the critical establishment period after repotting.
To repot, water the plant thoroughly one to two days before to ensure the root ball is cohesive and the plant is well-hydrated. Remove the plant from its current container by turning it on its side and gently squeezing or tapping the pot until the root ball slides free. If the roots have formed a tight, circling mass, gently tease the outer roots loose with your fingers to encourage them to grow outward into the new medium rather than continuing to circle. Position the plant in its new container so the base of the stem sits at the same level as it did in the original pot, fill in around the root ball with fresh potting mix, firm gently to eliminate air pockets, and water thoroughly. Place the newly repotted plant in a position with bright indirect light rather than full sun for the first week or two while it adjusts to its new growing environment.
- Choose a new pot only one size larger — two to four centimeters wider in diameter than the current container
- Water the plant one to two days before repotting to hydrate the root ball and make removal easier
- Gently loosen circling outer roots before placing in the new container
- Use fresh potting mix appropriate for the plant type — do not reuse the old, depleted medium
- Position the plant at the same soil depth as in its original container
- Water thoroughly after repotting and place in bright indirect light for the first week
- Avoid fertilizing for four to six weeks after repotting — the fresh potting mix provides adequate nutrition during establishment
When Repotting Is Not the Right Answer
Not every plant that looks tired or grows slowly needs a larger container, and repotting a plant that does not actually need it can cause unnecessary stress without providing any benefit. Some plants — peace lilies, ZZ plants, and many orchids among them — actually perform better when slightly root-bound, producing more flowers and maintaining a more compact, manageable form than they would in a generously sized container. Before deciding to repot, check the drainage holes and soil surface for the clear signs of root-binding described above. If the root system has not actually outgrown the current container, refreshing the potting mix without moving to a larger pot — removing the top few centimeters of old soil and replacing them with fresh mix — may provide the nutritional and structural benefits of repotting without the disturbance of a full container change.
Common Mistakes to Avoid
- Moving to a pot that is much larger than necessary — Oversized pots hold far more moist soil than a newly repotted plant’s root system can process, dramatically increasing the risk of root rot during the sensitive establishment period. Always move up only one size at a time.
- Repotting in autumn or winter — Plants in their slow or dormant phase lack the metabolic energy to recover quickly from root disturbance. Spring repotting takes advantage of the natural growth surge that helps plants establish themselves in new growing conditions rapidly.
- Reusing old, depleted potting mix — Old potting mix has lost its structure, nutrient content, and beneficial microbial activity. Always use fresh, quality potting mix when repotting to give the root system the best possible new growing environment.
- Watering heavily immediately after repotting — While thorough initial watering is important, the weeks following repotting require more conservative watering as the root system recovers from disturbance and adjusts to new conditions. Water sparingly until you see clear signs of new growth resuming.
- Assuming every struggling plant needs repotting — Root-binding is one possible cause of poor plant performance, but overwatering, insufficient light, pest damage, and nutrient deficiency produce similar symptoms. Check for root-binding specifically before repotting and address other potential causes first if the root system has not actually outgrown the container.
Frequently Asked Questions
Q: Can I repot a plant that is currently flowering?
A: It is generally best to wait until a flowering plant has completed its blooming cycle before repotting. The stress of root disturbance during active flowering can cause a plant to drop its flowers prematurely and redirect energy from bloom production to recovery. If a flowering plant is severely root-bound and showing signs of serious stress despite appropriate care, a careful repot is preferable to leaving it in a container that is significantly constraining its health — but under normal circumstances, waiting until the flowering period ends is the more considerate approach.
Q: My plant’s roots are growing out of the drainage holes but the plant looks healthy. Does it still need repotting?
A: Roots emerging modestly from drainage holes on an otherwise vigorous, healthy plant indicate an active, well-functioning root system that is approaching the limits of its current container. If the plant is growing well and showing no other signs of stress, you have some time before repotting becomes urgent — typically several more months. Monitor it closely and repot when growth begins to slow, soil dries unusually fast after watering, or the root emergence becomes more extensive. Repotting a plant proactively, just before it becomes truly root-bound, is always preferable to repotting reactively after performance has already declined.
Q: Should I fertilize my plant after repotting to help it recover?
A: No — avoid fertilizing for four to six weeks after repotting. Fresh potting mix contains sufficient nutrients to support the plant through the establishment period, and adding fertilizer to a root system recovering from the disturbance of repotting risks burning the tender new root growth that is just beginning to explore the new growing medium. Resume your normal fertilizing schedule once the plant shows clear signs of active new growth, which is the reliable indicator that the root system has established itself and is functioning effectively in its new container.
The Best Ways to Increase Humidity for Your Indoor Plants
Humidity is the silent variable in indoor plant care — the one that most beginners overlook entirely while focusing on watering, light, and fertilizing, and the one whose absence explains many of the persistent problems that otherwise well-maintained plants develop. The majority of popular houseplants are tropical species that evolved in environments where relative humidity regularly exceeds sixty or seventy percent. The average heated or air-conditioned home, by contrast, maintains indoor humidity levels of thirty to fifty percent in summer and as low as ten to twenty percent in winter when central heating runs continuously. This gap between what tropical houseplants evolved for and what most indoor environments actually provide is the underlying cause of the brown leaf tips, curling foliage, and general lack of vitality that characterize many otherwise adequately cared-for indoor plants.
Understanding Why Humidity Matters for Plants
Plants lose water continuously through their leaves via a process called transpiration — the release of water vapor through tiny pores called stomata that open to allow gas exchange during photosynthesis. In a humid environment, the air surrounding the plant already contains significant water vapor, which slows the rate of moisture loss from leaf surfaces and allows the plant to maintain its cellular water balance without excessive strain on its root system. In dry air, the gradient between the moisture inside the leaf and the dry air outside it is much steeper, driving faster and more intense transpiration that can exceed the root system’s ability to supply replacement water — even when the soil is adequately moist.
The visible consequences of chronically low humidity are familiar to anyone who has struggled with tropical houseplants in a heated home: brown, crispy tips on otherwise healthy leaves, leaf edges that curl inward, a generally desiccated appearance that no amount of watering resolves, and in humidity-sensitive species like maidenhair ferns and calatheas, a progressive browning and wilting that begins at the leaf margins and advances inward until the entire leaf is lost. Understanding that these symptoms are caused by atmospheric dryness rather than watering problems prevents the common mistake of watering more heavily in response — which adds root stress to the humidity stress already affecting the plant.
Which plants need the most humidity
Not all houseplants are equally sensitive to low humidity. Succulents, cacti, snake plants, ZZ plants, and most Mediterranean herbs evolved in dry environments and tolerate low humidity without difficulty. Tropical foliage plants — including monsteras, philodendrons, calatheas, marantas, ferns of all kinds, orchids, peace lilies, and anthuriums — have the highest humidity requirements and show the most visible symptoms when indoor air is too dry. If your plant collection includes species from these categories, addressing indoor humidity is not an optional refinement but a genuine care requirement for maintaining plant health through the dry seasons of the year.
The Most Effective Ways to Raise Indoor Humidity
Of the various methods available for raising humidity around indoor plants, grouping plants together is both the simplest and one of the most effective. As plants transpire — releasing water vapor through their leaves — the moisture they release accumulates in the air immediately surrounding them. A single plant contributes only a modest amount of vapor to the surrounding air, but a group of actively transpiring plants creates a measurably more humid microclimate around and between them that benefits every plant in the grouping. Position your moisture-loving tropical plants together in a cluster rather than distributing them individually across different rooms, and the collective transpiration of the group raises local humidity levels in a way that isolated plants cannot achieve.
A humidity tray — a shallow tray filled with pebbles and water, with plant pots positioned on top of the pebbles so that the pot base sits above the water level rather than in contact with it — provides a continuous source of evaporating moisture immediately beneath and around the plants sitting on it. As the water evaporates from the tray surface, it rises around the foliage and raises local humidity without creating the waterlogged conditions that direct contact between pot base and standing water would cause. This approach requires minimal investment — any shallow tray and a handful of pebbles or decorative stones creates an effective humidity tray — and provides a consistent, passive source of moisture that persists between active care interventions.
Using a Humidifier for Consistent Results
For plant owners with significant collections of humidity-demanding tropical species, or for anyone who wants to maintain consistently elevated humidity throughout the year without daily manual intervention, a dedicated room humidifier is the most reliable and controllable solution available. A small ultrasonic humidifier positioned near your plant collection and set to maintain forty to sixty percent relative humidity provides the atmospheric conditions that tropical plants evolved for, producing noticeable improvements in leaf quality, growth rate, and overall plant vitality within a few weeks of consistent use.
When choosing a humidifier for plant use, a cool-mist or ultrasonic model is preferable to a warm-mist one, as the warm, moist air produced by heating-based humidifiers can encourage fungal disease on plant foliage if the unit is positioned very close to the plants. Position the humidifier so that air movement distributes moisture throughout the room rather than directing a concentrated stream of moisture onto the foliage of specific plants, and clean it regularly according to the manufacturer’s instructions to prevent the accumulation of mineral deposits and the potential growth of mold or bacteria in the water reservoir.
- Group plants together — collective transpiration creates a more humid microclimate that benefits every plant in the group
- Use a pebble humidity tray — inexpensive, passive, and effective for raising local humidity around individual plants or small groups
- Run a cool-mist humidifier — the most reliable method for consistently maintaining target humidity levels throughout the year
- Place humidity-loving plants in bathrooms and kitchens — these rooms naturally maintain higher humidity from daily use and suit moisture-loving tropicals exceptionally well
- Use terrariums for the most sensitive species — a closed or semi-closed terrarium creates a self-sustaining humid microenvironment ideal for ferns, mosses, and other high-humidity plants
- Avoid placing tropical plants near heating vents and radiators — these create intensely dry air immediately around them that counteracts all other humidity efforts
What About Misting?
Misting — spraying a fine mist of water directly onto plant foliage — is one of the most widely recommended and most debated humidity practices in houseplant care. The honest assessment is that misting provides only brief, temporary increases in humidity that evaporate within minutes and have no measurable lasting effect on ambient air moisture. For raising humidity in any meaningful, sustained way, it is significantly less effective than any of the approaches described above. Where misting does provide genuine benefit is for specific plant types — orchid aerial roots that benefit from direct moisture, air plants that absorb water through their leaves, and the occasional dusty leaf that benefits from a light rinse — rather than as a general humidity solution for a mixed plant collection.
There is also a legitimate concern about misting that should be considered for plants with large, flat leaf surfaces in environments with limited airflow. Water droplets that remain on leaf surfaces for extended periods — particularly on plants positioned in lower-light conditions where the slower evaporation rate leaves foliage damp for longer — create conditions that fungal pathogens can exploit. Misting in the morning, in a location with good air circulation, minimizes this risk by allowing foliage to dry before the cooler, lower-evaporation conditions of evening arrive. For plants in genuinely dry conditions, a gentle morning mist is a harmless supplement to other humidity measures. As a standalone humidity strategy, it is insufficient for any plant with serious humidity requirements.
Common Mistakes to Avoid
- Misting as the only humidity strategy for high-humidity plants — Misting raises humidity for minutes rather than hours and is insufficient as a standalone approach for plants with genuine humidity needs. Use it as a supplement to grouping, pebble trays, or a humidifier rather than as a replacement for them.
- Placing humidity-loving plants near heating vents and radiators in winter — The warmth of a radiator seems intuitively beneficial, but the intensely dry air it produces immediately around it is deeply harmful to tropical plants. Keep moisture-loving plants away from any direct heat source and compensate for winter dryness with a humidifier or pebble tray.
- Confusing humidity symptoms with watering problems — Brown leaf tips, curling leaves, and a crispy leaf edge appearance are classic low-humidity symptoms but are frequently misidentified as signs of underwatering. Adding more water to a plant showing humidity stress does not address the problem and risks overwatering the root system. Check ambient humidity first before adjusting watering.
- Misting plants with fungal susceptibility or fuzzy leaves — Water sitting on fuzzy leaf surfaces like those of African violets, begonias, and some succulents creates conditions for rot and fungal disease. These plants should never be misted — raise their humidity through grouping and pebble trays instead.
- Neglecting humidifier maintenance — A humidifier with a dirty or contaminated water reservoir disperses mineral deposits and potentially harmful microorganisms into the air along with its moisture output. Clean humidifiers regularly, use distilled or filtered water where possible, and follow the manufacturer’s maintenance schedule to ensure the device provides genuinely clean, beneficial moisture output.
Frequently Asked Questions
Q: How do I know if my plant is suffering from low humidity rather than a watering problem?
A: The location of the damage on the leaf is the most reliable diagnostic indicator. Low humidity damage typically begins at the very tips and outermost edges of leaves — the points furthest from the plant’s water transport system and most exposed to dry air — and progresses inward slowly, producing a brown, dry, crispy margin that is clearly distinct from the healthy green tissue toward the leaf center. Watering problems produce more widespread yellowing or wilting that affects entire leaves rather than just their margins. If your plant has brown leaf tips and edges but otherwise healthy-looking foliage, and the soil moisture is appropriate for the species, low humidity is almost certainly the cause.
Q: What is the ideal humidity level for most tropical houseplants?
A: Most popular tropical houseplants perform well at relative humidity levels of forty to sixty percent — a range that is comfortable for people as well as plants and achievable in most homes with modest humidity management. The most humidity-demanding species — maidenhair ferns, calatheas, marantas, and some orchids — prefer sixty percent or above and truly thrive only when this level is consistently maintained. A basic digital hygrometer, available for a few dollars, measures the relative humidity of any room accurately and provides the information you need to assess whether your plants’ environment requires active humidity management.
Q: Can I grow humidity-loving plants in a room that is naturally dry?
A: Yes, with the right combination of strategies. Grouping plants together, using pebble trays beneath them, and running a small humidifier near the collection creates a local microclimate significantly more humid than the surrounding room — sufficient to support even moderately demanding tropical plants in most indoor environments. For the most sensitive species in genuinely dry rooms, a terrarium provides the most controlled high-humidity environment available without requiring continuous active management. The key is recognizing that dry-room plants need humidity support rather than expecting them to adapt to conditions their biology is not equipped for.